Showing posts with label recipe. Show all posts

Friday, October 5, 2012

Raw Buckwheat Porridge

Okay, so the name doesn't necessarily sound appetizing, but don't knock it till you try it! This is, by a mile, my new favorite go-to breakfast food. There is zero prep time in the mornings once you've made a big batch of this. Just ladle into a bowl, throw some fruit or whatever else you want on top, and chow down. And unlike oatmeal, I could eat this plain with no toppings or extra sugar or anything and still be 100% satisfied.

Raw Buckwheat Porridge

Beautiful, isn't it? Sweet, almost snow-white, creamy in texture, and deliciously frosty, this could ac almost pass as a very filling dessert. So good! And, wonderfully enough, so simple. The best part of all is that it is super healthy and packed with fiber.

Step 1: Soak the groats. I start with 2 cups of groats and 4 cups of water, letting them sit overnight in the fridge. You should be able to find these at any health food store, and probably large grocers as well. Make sure they are whole raw groats, not anything that has been cut or processed! Here is what they look like:

Raw, unprocessed, whole buckwheat groats.

Let the groats soak overnight in plenty of water in the refrigerator.

Step 2: Rinse the groats. This is the hardest part. When you take them out of the fridge in the morning, you'll notice that everything got a little slimy. Don't be alarmed! Like a flax egg, the buckwheat groats caused the water to congeal a little. Drain them and rinse them with a fine colander or strainer. They don't have to be perfect, just make sure they are cleaned off for the most part (you don't want slimy porridge!).

Step 3: Process everything together. Place the rinsed groats in a large food processor (I had to do mine in two batches since the one I have is tiny). Add the following ingredients and blend until smooth:
  • 1 and 1/4 cups milk (I used sweetened vanilla almond milk)
  • 2 tbsp chia seeds
  • 1/3 cup agave nectar
  • 1/2 tsp salt
  • 1 tbsp vanilla extract
  • 1 and 1/2 tsp ground cinnamon
If you've never used chia seeds before, you can find them in natural foods stores and in the spice section of larger grocery stores. They are a little pricey, but a little baggy from the bulk spice counter will last a while and won't cost much at all.

Chia seeds.

Also, feel free to add an extra dash or two of milk as you are processing in order to achieve the desired texture. I (accidentally) made the first batch rather coarse and the second batch very smooth, and when I mixed them together the result was lovely. I like a little bit of bite with mine. Play around with it to figure out what you like best.


Step 4: Top and serve. I have found the my favorite topping is diced strawberries, but a mixture of raspberries and blackberries are lovely as well. I didn't think that bananas worked as well, but then again I am picky about my bananas. You could do any sort of dried fruit, nuts, seeds, etc. Be creative--there is pretty much no way to go wrong!


A big thank you to Angela at Oh She Glows for this recipe. That is currently my favorite website and every single recipe of hers that I've tried as been amazing. Check it out!

Sunday, September 16, 2012

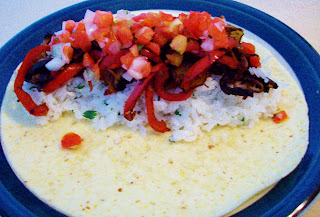
Portobello Fajitas

Sorry guys--I wasn't very on task today with the cooking, again! Too much homework, not enough time. The one new recipe I did get to try, however, turned out to be pretty darn good.

Portobello Fajitas

Out of pure laziness I decided to try to cook the rice in the microwave while I made the fajita filling--it was okay, but a little too gooey. I probably won't be doing that again. The fajita filling was super easy. All I did was saute onion, red pepper, portobello mushroom strips, and garlic, add some cumin and chili powder at the end, and deglaze with a bit of white wine to finish. The recipe called for just that, but I decided to get fancy with mine and put some cilantro lime rice on the fajita as well. I wanted a little freshness as well so I topped it with a bit of pico de gallo.

Like I said, it was good, but I am dreaming bigger. I'm thinking fajita burrito. Cilantro lime rice, black beans, fajita veggies, pico de gallo, and a big dollop of guacamole. You could make it a fajita burrito bowl too, skipping the tortilla and adding some lettuce. And then there is corn salsa... The possibilities are endless!

One of my favorite restaurants is Chipotle, and this is a lot like something you could get there, though I'm sure theirs is going to be 10x tastier. With all the vegan options they offer, I think I'll have to pay them a visit soon. As a quick fix at home though, this versatile recipe did the trick.

Tuesday, September 11, 2012

Dan Dan Mian

This is probably one of my favorite recipes thus far, but then again it doesn't take very much Asian food to sway me. This also happens to be one of the quickest and easiest recipes as well, and I can easily see this becoming a lunch time staple from now on. I've only eaten hours ago and I'm already craving another bowl.

Dan Dan Mian

Don't ask me what the name means, by the way. I haven't a clue.

Basically all you have to do is boil some soba noodles noodles for 4 minutes. Soba noodles are made of buckwheat, but mine had yam as well. One bunch, or about 3.5-4 ounces, of noodles is one generous serving.

Soba Noodles

Next, in a small dish you'll want to mix up the sauce. I used 1/2 teaspoon of chili paste and 2 teaspoons of rice wine vinegar. Then I added enough soy sauce to dilute the spiciness to the level I wanted. Low sodium soy sauce is always the way to go if you are using more than a teaspoon.

The chili paste and rice wine vinegar came from an Asian market.
The soy sauce and sesame seeds came from Food Lion.

One the noodles are done, drain them and return them to the pot. Dump the sauce over top and stir (you'll have to play around to get the amount of sauce right--I ended up having to use extra soy sauce). Serve them with green onion and sesame seeds on top.


So much awesomeness in such a little bowl...

This recipe also called for pickled cabbage on top but I didn't have any. Maybe next time!

Too Pretty to Eat (Almost)

I didn't end up having time to eat any dinner last night, but I was able to make my super delicious lunch consisting of a Balsamic Zucchini Sandwich. I've already posted this recipe, but I just want to share the beauty once more...

Balsamic Zucchini Sandwich
*angels singing*

Saturday, September 8, 2012

The Perfect Pancakes

This morning's menu was pancakes, maple syrup, and fresh raspberries. Easy, delicious, and right up my ally. Now that I've made vegan pancakes a few times, I've got the recipe perfected.

Pancakes with Maple Syrup

I've discovered that it is easiest to just combine everything right in a measuring cup. That way it is easy to pour as well. You'll need:

2/3 cup of soy or almond milk
2/3 cup whole wheat flour
3 tablespoons of cane sugar sugar
2 tablespoons of baking powder
1 and 1/2 tablespoons of vanilla extract
1/4 teaspoon salt

Pour the milk up to the 2/3 mark on your measuring cup (I use one with a two cup capacity and that is plenty big) and then add the rest of the ingredients. When you've got everything dumped in, stir with a whisk--it should only take a few stirs. Let the batter set for just a moment while you let the pan get hot; medium heat should do it. You can use a bit of nonstick spray if you feel it is necessary (I never need any because I have a nonstick pan). Your batter should have gotten very fluffy in the meantime, with the actual volume increasing by about 25%. If you have a large pan you can do pancakes two at a time, but no more because they'll spread out a lot. You know the drill--wait until the top bubbles and then flip on the other side for about a minute. I've found that these pancakes go quite fast.

This recipe serves two, and made seven medium-sized pancakes for me this morning.

Quite a long shot from those thick, tough mango pancakes I made on my first day, right? I'm not sure why the batter was so thick then, which wasn't actually bad, but light and fluffy is surely the way to go. You can tell that these are wheat, but I honestly think that they are just as good as buttermilk pancakes. Enjoy!

Friday, September 7, 2012

Day 6

The menu for today is:

Breakfast:
Pancakes with sliced strawberries
Caribbean Passion Breakfast Smoothie (recipe)

Lunch:
The Perfect Portobello Burger (recipe)
Sweet Potato Fries (recipe)

Dinner:
French Onion Sourdough Soup (recipe)
Linguine with Seared Oyster Mushrooms (recipe)
Baked Cardamom Pears (recipe)

I am especially excited for today because I absolutely adore mushrooms, and here they are featured in two separate recipes! Crossing my fingers that today is a good day.

Monday, September 3, 2012

Dinner

This is dinner for day one. Talk about a three course meal--this was a huge amount of food! I made a Balsamic Pear Salad, Caldo Verde, and Fettuccine with Asparagus, Peas, & Lemon.

Day One Dinner

I almost didn't make everything that the book had listed, but decided to stick to the plan as closely as possible. Whereas my earlier meals were fairly simply, I basically destroyed the kitchen while making all this. Flipping through the upcoming menus, I notice that everything is quite a bit simpler than this, and it makes me wonder if they tried to be impressive on the very first day and took it a little over the top. Either way, I'm glad there are no more "feasts" in my immediate future.

Admittedly, I didn't really like any of theses three dishes. I started off making the Caldo Verde, which I believe is supposed to be a Portuguese version of Zuppa Toscana. This is not what it turned out like...

Looks pretty good so far...

I think a lot of the reason for this was human error. The recipe said to blend the potatoes to get a puree. All I had was Carla's little food processor, and the bottom came unscrewed while I was blending. All of the boiling hot liquid pour out (all over my book). So after this point, it wasn't really soup anymore. It was more like mushed onion and potato baby food. Yuck.

Caldo Verde

The recipe called for half a bunch of kale, which I think ended up being a little too much. Also, it called for soy chorizo or another vegetable-based sausage. The only kind I could find in Krogers that was vegan was a brand called Gimme Lean, which was basically chunky refried beans in a chub. Following the instructions carefully (and against my better judgement), I just plopped some of that in at the end and tried to break it up with the spoon. Bad idea. I would make this again, but with some serious alterations. I would have sauteed the onions and garlic first, used vegetable stock, diced the kale finer, made sure there was a lot more liquid, and IF I decided to use the veggie sausage again, I would cook it and crumble it in a separate pan first. This recipe was edible, but just barely.

Next was the fettuccine. This one sounded promising to me, though I was confused about what I was supposed to dress the noodles with. As it turns out, nothing. Also a bad (and very sticky) idea.

Fettuccine with Asparagus, Peas, & Lemon

The asparagus was to be tossed in a garlic lemon sauce before grilling, but once they were on the grill that sauce evaporated and the asparagus got very dry. The pasta also had a bunch of chopped parsley in it. The only variety of parsley I could find at Krogers looked very odd to me, but it was that or nothing so I bought it. It was a flat-leaf variety, and it turned out to be bitter and spicy and overly aromatic. It pretty much ruined whatever goodness would have been in the dish to begin with. The noodles were sticky and flavorless so I squeezed the juice of one lemon over them, which was actually quite nice. I ended up eating these with my fingers and picking bits of parsley off of the noodles and my tongue as I went along. Less than an awesome experience, to say the least. If I were to make this again I would have steamed the asparagus and peas in the oven in aluminum foil with the garlic lemon mixture. I would have poured the entire packet on top of the freshly drained noodles, and then used some normal parsley to top it off. This recipe has potential, but it needs some major changes.

Lastly but not least (well, actually yes, least) is the salad. It is comprised of arugula, Bartlett pear, radish, and a red wine vinegar reduction.

 
Balsamic Pear Salad
 
I really like fruit on my salads so I thought for sure this one would be a winner. I was wrong. Have you ever had raw arugula? It is awful. It was so bitter that it actually induced an involuntary gag reflex when it got to the back of my throat. There was only one brand at the store, which looked less than stellar, so maybe the quality was the problem. Either way, I took only one bite before pushing it away. I ended up picking the pears and radishes off the top and eating those. The dressing was lovely though, I must say. The recipe called for balsamic vinegar, but all I had was red wine vinegar. I put some in a pan and let it reduce until it was a little thicker, and then drizzled that over the salad. I will definitely be using the vinaigrette recipe again.
 
 
Three strikes, your out. It was a little disappointing, especially after all the effort it took to cook it, but it is okay really. Dr. Barnard says that if you don't get the occasional dud then you are not experimenting enough. We'll just chalk this up to a valuable culinary learning experience.

Sunday, September 2, 2012

Seven Layer Garden Nachos

Okay, so maybe this isn't what they're really called, but I couldn't find blue chips and it seemed more to me like nachos than a salad. This was my lunch for day one.

"Blue Corn Chip Salad", A.K.A. Seven Layer Garden Nachos

I thought for sure that I was going to miss my normal fixin's such as cheese and sour cream, but let me tell you--I was wrong. Very wrong. This just might be some of the best nachos I've ever had, and that is without and meat, cheese, or dairy! Mom, you'd go nuts over these.

The first layer of the nachos is the chips themselves. Since one of the rules of the 21-Day Weight Loss Kickstart is to reduce oils, I had to get baked chips. There was only one type of baked tortilla chip that Krogers carried (and this is an incredibly large and diverse store), and it was not blue. I ended up getting Baked! Tostitos Scoops.

Layer One: Chips

The second layer is composed of lettuce. I got red leaf lettuce, which is simultaneously beautiful and tasty. The recipe said to tear it into bit size pieces, but instead I removed the thicker stem pieces and then did a chiffonade cut. We eat with our eyes first, and just looking at those purple little swirls was making me hungry!

Layer Two: Lettuce

The third layer is black beans. I just got a cheap can of the store brand packed in water. I used half of a 15 oz can on my nachos.

Layer Three: Beans

Layer four is a fresh diced Roma tomato. The recipe called for half of one, but mine was so tiny I decided to use the whole thing.

Layer Four: Tomato

The fifth layer is a half cup of any type of salsa. I went with a jar of ChiChi's mild salsa, and that was quite nice. Obviously if you like it hot, go nuts. One option for the future is to skip the fourth layer of tomato and just make this layer a nice heap of fresh pico de gallo. Yum!

Layer Five: Salsa

Layer six is roast red pepper. The recipe called for one and a half peppers, and that sounded like an awful lot to me. I ended up opting for only one pepper, which still seemed like too much but ended up being just perfect. Make sure that these are packed in water with no added oils. I julienned them, but you can dice them however you like.

Layer Six: Roasted Red Pepper

The last layer is comprised of any toppings you might want. I used unprocessed pepitas, which the book suggested. I also decided to put a little fresh cilantro and a squeeze of lime. I'm glad I did, because I feel like it really elevated all of those already delicious flavors to another level. And, ta-da! Observe your masterpiece.

Layer Seven: Toppings (Cilantro, Pepitas, Lime Juice)

The menu for today also included a watermelon salad tossed with lime juice. I got the cutest little melon from the farmers' market, which is the perfect size for just me. I also got a bunch of fresh mint at the market, and decided to chop a few leaves up very finely and add that to the watermelon salad as well. Remember about eating with your eyes? Here's a close-up:

Watermelon Salad with Mint and Lime

This was actually so much food that I couldn't finish it. I had about half a cup of random veggies left on my plate and had to put most of my half cup of watermelon back into the container as well. That's okay though, the watermelon will be a good snack between classes tomorrow. The only hard part about this diet thus far has been eating the recommended amounts of food! They weren't kidding when they talked about "real" portions. Perhaps dinner will have to be rather later tonight... Also, if any of you readers happen to be in my neck of the woods, please stop by--there is more than plenty of deliciousness to go around. I feel bad that I keep shoving it at Helen when she's not much of an eater to being with.

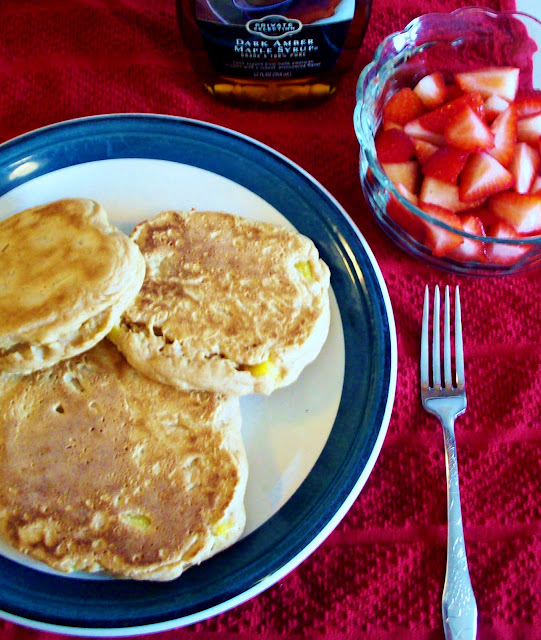
Mango Lime Pancakes with Maple Syrup

This is breakfast, day one of the 21-Day Weight Loss Kickstart and my "vegan adventure," as one friend put it.

Pancakes seem quite decadent to me, so I was thrilled to see them on the menu for today. I was a little nervous about the fact that they are whole wheat (that usually means they taste like cardboard), and I hadn't had real maple syrup since I was a kid--I absolutely hated it back then. But tastes change over time, so I decided to give it a try regardless.


Mango Lime Pancakes with Maple Syrup

The recipe for these pancakes called for equal parts whole wheat flour and soy milk (a serving size was a third of a cup of each), a tablespoon of baking powder, and a pinch of salt.

Ingredients and supplies.
 
 
Once the batter was stirred together, I added some diced mango and lime juice. The recipe called for only a eighth of a cup of mango, but I used a quarter cup. Also, the recipe called for just half a tablespoon of lime juice. I felt like that wasn't very much lime flavor, so I also added a quarter teaspoon of lime zest.
 
 
Diced mango, lime juice, and lime zest gave this recipe lots of really good flavor.

The batter looked appetizing, but was very, very thick.

The measurements I provided above were for a single serving. The actual recipe was for two, and I just because I didn't pay close enough attention I ended up making the entire batch. It was supposed to yield four large pancakes, but I ended up getting one small, one medium, and one large sized pancake. By the end I was getting the hang of the batter, which is so thick that I had to kind of spread it around on the pan with a spatula. You also need less batter per pancake than you think due to the fact that it puffs up a lot.

This was the first one. They got prettier as time went on...
The pancakes turned out wonderful! They took much longer to cook than normal pancakes, probably about 8 minutes a piece. The outside got quite thick, so that they were difficult to cut through with a fork. The inside was very soft and fluffy though, and not cardboardy at all. I found them to be quite on par enjoyably with your average buttermilk pancakes.

Bon Appetit!
Turns out that I actually really loved the maple syrup as well, which I was delighted with. I've had a similar experience recently with honey, which I never liked before now either. The only thing I didn't like about the pure maple syrup was that it was almost $10 for that bottle. It will last a long while, I'm sure, but it was more than I am used to spending.

All in all, I would consider this recipe a winner and a bangin' start to my new diet!